Monday, December 12, 2016

New Mikuni VM20 carbs - Yamaha RD125 A


Although the bike was running after installing the original Teikei carbs, one of the carbs was on the rich side. It wasn't possible to tune it leaner and sometimes the throttle valve woudn't sink in all the way.
So I decided to take the carbs off for a closer inspection.
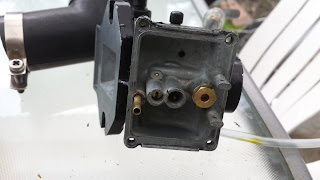
Damn...The tube inwhich you screw in the needle valve had a crack in it... and when I tried to take out the main jet with needle valve it almost snapped completely off.
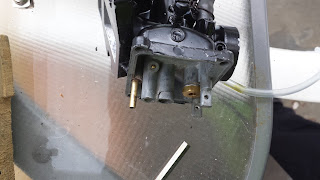
Teikei carb with cracked tube

Teikei carb with cracked tube

I tried to fix it with JB Weld but I'm afraid it won't hold long when submerged in petrol.
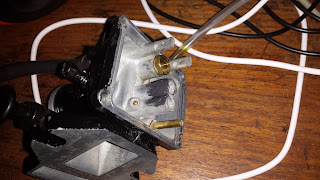
Trying to fix the crack with JB Weld


So I started the hunt for a new Teikei carb, but I only could find used ones which were pretty expensive too.
On the aircooledrd forum I got a tip that you could use Mikuni carbs on the Yamaha RD125 A. but only if you mount extra manifolds on top of the original reed valves... The Teikei manifold is integrated in the carb but the Mikuni VM carb is just flat.

So what's the best size Mikuni VM carb for the Yamaha RD125? In a tuners manual I found a formula to calculate the Venturi / throat size of the carb:


For racing engines, the constant, K, is given as 0.8 to 0.9, so let's take 0.8 for the Yamaha RD125.
C=125/2/1000=0.063
N=9500 rpm according to the bike specs
Using the formula, The right venturi size (D) is around 20 mm

So the Mikuni VM20-273  is gonna be the best choice. I'm using the same size carburettor on my Yamaha LS3 100 with good results.

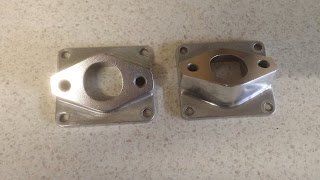
It is possible to mount the manifolds of a Yamaha CT1 175 (1972-1973) on top of the original Yamaha RD125 Reed valves. You can still find them on Ebay for around 15 dollar each. I bought the manifolds in the USA and the VM20 carbies here in Australia.
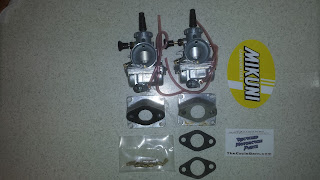
Mikuni VM20 carburettors and Yamaha CT1 manifolds
Mikuni VM20 carbies and Yamaha CT1 manifolds

Yamaha CT1/CT3 manifolds
Yamaha CT1 manifolds

Yamaha CT1 manifolds

Mikuni VM20 carburettors with Yamaha CT1 manifolds
Mikuni VM20 carburettors with Yamaha CT1 manifolds and gasket

 You'll also need longer manifold/reed mounting bolts (M6 1.00 30mm long) and shorter carbie mounting bolts (M8 1.25 25mm long). I didn't use the spacers that came with the manifold because I wanted the distance from carb to cylinder as short as possible. 
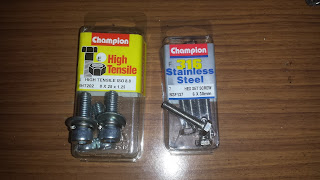
 
New bolts for the VM20 carbs and manifolds
New bolts for the VM20 carbs and CT1 manifolds
You also need to make your own manifold/reed gaskets or use gasket sealant as the original RD125 ones probably won't stay in place (No bolts to hold them in place...).

original teikei gasket


cutting new carburettor gaskets

Between the VM20 carbies and manifold I also used gaskets as the O-ring in the carbs didn't meet the manifolds surface all the way round (see pic below) The gaskets which are normally between the distance holder and manifold are perfect for the job.

Yamaha CT1 manifold wih Mikuni VM20 carburettor

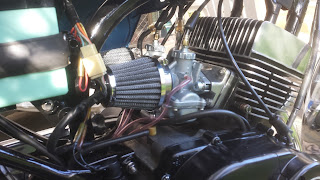
When you have gathered all the parts is pretty straight forward to fit the new carbies. I removed the original air filter box and used two pod air filters instead. With those "open" pod filters you need bigger main jets.

Pod air filters Yamaha RD125A

You also have to exchange the cable holders between the original Teikei carbs and the new Mikuni carbs as the original cables are too "big" for the new carbies. The tread is the same so that's an easy swap

original Mikuni cable holder and the bigger Teikei cable holder
Original Mikuni Cable holder and the bigger Teikei cable holder


Yamaha CT1 manifolds on RD125 engine

Mikuni carburettors mounted on Manifolds -Yamaha RD125 1974
Mikuni carburettors mounted on Manifolds

Pod airfilters fitted (43 mm)

This Mikuni is supplied with the following factory jetting installed:
Pilot jet 22.5 (M28/1001)
Needle 4J13
Needle Jet O-6/N-6 (238/332 Series)
Main Jet 180 (4/042)
Air Jet 0.5
Slide Cutaway 2.0 (VM38/24)
Needle valve 1.5

Probably not the right jetting for the Yamaha RD125 A. A search on internet about jetting similar engine sizes and carbs pointed in the direction of 90-140 Mikuni main jets. I'll start with the original jetting in place and work my way down to leaner jets. One of the nice things about the VM20 carb is that the main jet can be changed from the outside of the carb.

The bike started after 3 kicks and ran pretty smooth, but after a couple of minutes one of the cylinders cut out. When I checked the plugs they where completely wet... Time to start the most time consuming part; finding the right jetting for the bike. A correctly jetted carb makes a big difference in the torque, midrange pull, topend pull, and overall-revving of the engine.
It's just a matter of trail and error and knowing what to look for:

Throttle Ranges:
Pilot Jet/air screwtrottle slide valve: 0-1/4
Needle Jet:1/4-3/4
Main Jet: 3/4-Full open


I swapped the #120 for #115 main jets. A bit better but still too big... Anyway after some trial and error it seems like #100 and #105 are the best main size jets. Probably #100 in summer and #105 in winter.

Maybe it needs a pilot jet swap from #22.5 to #25, But first I've to buy and try 'm...

Here's a link to the bike's first start with the new Mikuni carbies on youtube: https://www.youtube.com/watch?v=85CCc4rf8Rg



Saturday, July 23, 2016

Fixing the Teikei carbies

One of the things I still had to clean were the 2 Teikei carburettors. They're not as common as the Mikuni and Keihin carbs so there's not a lot of info about them and parts are hard to find.

Incredible how the bike still ran with those dirty float chambers....

18 mm Teikei carburetor - Yamaha RD125 A 1974
18 mm Teikei carburettor - Yamaha RD125A

18 mm Teikei carbies - Yamaha RD125 A
18 mm Teikei carbies Type Y18P-1C

Dirty fuel bowl Teikei carbie Yamaha RD125
Dirty fuel bowl Teikei carbie

Dirty fuel bowl Teikei carbie
Dirty Teikei carbie

The satin black paint was flaking, time for a fresh coat. VHT caliper paint is very close to the original and maybe even more important it's chemical resistant after 1 hour baking at max 93 degrees Celcius.
After stripping the paint I masked the carbies and applied 3 coats of the caliper paint.

Removing old paint with paint stripper - Teikei RD125 carb
Removing old paint with paint stripper

Ready for some new satin black paint

Masked and ready for some new satin black paint - Teikei carburettor
Masked and ready for some new satin black paint

Masked and ready for some new satin black paint - 18 mm Teikei carburettor
Masked and ready for some new satin black paint

Fuel bowl with 3 coats of VHT caliper satin black paint -Teikei carbie
Fuel bowl with 3 coats of VHT caliper satin black paint

Teikei carbie with 3 coats of VHT caliper satin black paint
Teikei carb with 3 coats of VHT caliper satin black paint

VHT caliper satin black paint

Next thing to look at were the jets. According to the original RD125A parts list the 18 mm Teikei carburettors have #96 main jets. The later RD125B uses the same carbs with #94 main jets.

In my RD125A carbs I found the following parts:
#94 main jet
#44 pilot jet
N80 needle jet
4D50-2 Jet needle - clip position 
2.5 Cut away 
16 Needle valve and seat assembly 

The Keyster kit I bought (advertised as suitable for all RD125 Yamaha's...):
#66 main jet
#44 pilot jet
Y54 Jet needle 
16 Needle valve and seat assembly 

So the new main jets are way to small and the needle is 0.5 mm longer. 

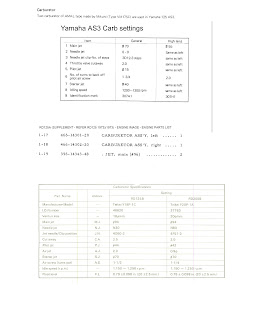
RD125 A, RD125 B and Yamaha AS3 carb specs and settings

Keyster KY-0160 carbie repair kit Yamaha RD125
Keyster KY-0160 carb repair kit Yamaha RD125

Carbie parts 18mm Teikei Yamaha RD125 A

#94 Main Jet - 18mm Teikei carburettor Yamaha RD125A
#94 Main jet - 18mm Teikei Yamaha RD125

#44 Pilot jet - 18mm Teikei carb Yamaha RD125 A
#44 Pilot jet - 18mm Teikei Yamaha RD125 A

Old and new needle 18 mm Teikei carburettor - Yamaha RD125 A
Old and new needle 18 mm Teikei carb - Yamaha RD125 A

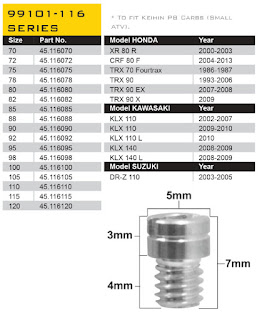
I still needed other main jets or keep on using the old ones. Original Teikei parts are really hard to find but I've read that some Keihin jets will fit as well. Look for the 99101-116 series, they have almost the same dimensions to replace the old main jets and more important the same thread M4x0.75.

Keihin 99101-116 series main jets - used in Yamaha RD125 carbs
Keihin 99101-116 series main jets


So, what's the best size to use? Some say go for a smaller jet.. the story behind going for a smaller jet when the capacity increases is a bigger bore creates a higher vacuum, pulling more fuel then before. Hmm.. I think this only make sense when you go for a really big overbore.
In my case it's only first oversize pistons and we're talking about an increase of ≈ 1.5 cc

The formula to calculate the capacity of an engine:

Capacity (in cc)  =  (π/4 x bore² x stroke x # cylinders)/1000   (note: π ≈ 3.14)
Original engine: (3.14/4 x 43² x 43 x 2)/1000    124.8 cc
Rebuild engine with 43.25 mm pistons:
 (3.14/4 x 43.25² x 43 x 2)/1000    126.3 cc
An increase of 1.5 cc !


For now I'll start with the original #94 main jets and then try the #100 Keihin jets, if it's too rich the #98's will be the next jets to try out.

Checking the float height on both Teikei carburettors - Yamaha tw stroke
Checking the float height (ca 20 mm) on both Teikei carburettors

Last but not least make sure the air supply is ok. Pack your mufflers, use airfilters in the airfilter box and make sure the rubber boots are in good shape. Like with most older bikes the original rubber boots on the RD125 were hard (especially on the carb site) which made it almost impossible to seal 'm properly. 


Old and new carburettor boots Yamaha RD125 A 1974
Old and new carb/airfilter boots Yamaha RD125 A

Cutting the new carb boots Yamaha RD125 A
Cutting the new carb boots - originals are for the AS3

Re-packing the exhaust muffler Yamaha RD125 A
Re packing the exhaust muffler Yamaha RD125
The original Yamaha RD125 airfilters are hard to find, so when I found some old Honda pre-oiled air filters on special for 2 dollar each it was an easy choice, just a matter reshaping them a bit.


Pre oiled air filter

Time to start the engine....
https://www.youtube.com/watch?v=6t2mZJeN0AM


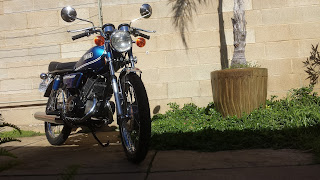
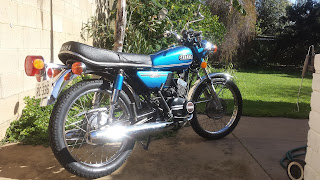
Yamaha RD125 A 1974 two stroke
Yamaha RD125 A 1974

Yamaha RD125A 1974 two stroke
Yamaha RD125 A 1974 two stroke


Friday, May 13, 2016

Fixing broken Tanaka mirror Yamaha

The bike came with two original Tanaka mirrors, no clamps, and one of the mirrors had a couple of big cracks. I decided  to replace the glass as I couldn't find a similar Tanaka mirror on the net.

Original Tanaka Yamaha RD125 A mirror 1974
Original Tanaka Yamaha RD125A mirror
It looked pretty simple, just cut a new mirror, but I found it a bit difficult to measure the old mirror diameter. To play it safe I measured it and then made a paper template... After the third try it was OK...

Paper template, piece of mirror and lamp oil
In a second hand shop I found a nice mirror for 2 bucks.

Now take your glass circle cutter of the paper template and mount it on the real mirror.  With a cotton ball wipe some lamp oil on the glass where you wanna cut it, this will give you a nice smooth cut. Apply light pressure and move the cutter all the way round but DON'T go over the starting point (otherwise you'll damage the smooth first cut), you'll hear a kind of click and that's the sign to stop, take the cutter off and push on the edge all the way round while holding your thump underneath...   after that tap the mirror underneath at the cut (the glass cut is only a light scratch..) keep tapping until you hear a glass cracking sound.. now push on the crack with your thumb again. You'll see the cut getting deeper while pushing along the cut. After that you can carefully remove the outer edges. If it's too hard you can make a couple of extra straight cuts from the edge of the circle towards the edge of the original mirror (see second pic below where I made one extra straight cut).

Cutting a new mirror - Yamaha RD125A
Cutting a new mirror - Yamaha RD 125 A

Cutting a new Tanaka mirror - Yamaha RD125A
Cutting a new mirror - Yamaha RD 125 A

After removing the old mirror glass I finally could reach the inner nut of the Tanaka mirror and take it apart.

Taking apart Tanaka mirror - Yamaha RD125A
Taking apart Tanaka mirror - Yamaha RD 125 A

Taking apart chrome motorcycle mirror - Yamaha RD125A
Taking apart Tanaka mirror - Yamaha RD 125 A

It needed a good clean and a new nut. I fitted the new mirror with acid free silicone (don't use other silicons as the will stain the silver mirror after a couple of weeks).


Special mirror silicone - Acid free silicone

New mirror glass in place - Tanaka Mirror Yamaha RD125A 1974
New mirror glass in place - Tanaka Mirror Yamaha RD125 A

Before I fitted the new mirror I used some Loctite on the inside nut. You cannot tighten this nut too much (no movement anymore) and you don't want to get it loose after fitting the new mirror. So make sure you give it the right torque before you fit the new mirror glass.

Using Loctite on the inner mirror nut - Yamaha RD125 1974
Using Loctite on the inner mirror nut - Yamaha RD125

After searching for a couple of weeks for the original mirror brackets I finally found a couple on Ebay, I got them today and they look really good, still in the original Yamaha plastic sealed bag.

Original mirror brackets Yamaha RD125 A 1974
Original mirror brackets Yamaha RD125A

Original mirror brackets Yamaha RD125A
Original mirror brackets Yamaha RD125 A 1974